Roof Inspection PDF Template
Roof Inspection PDF Template
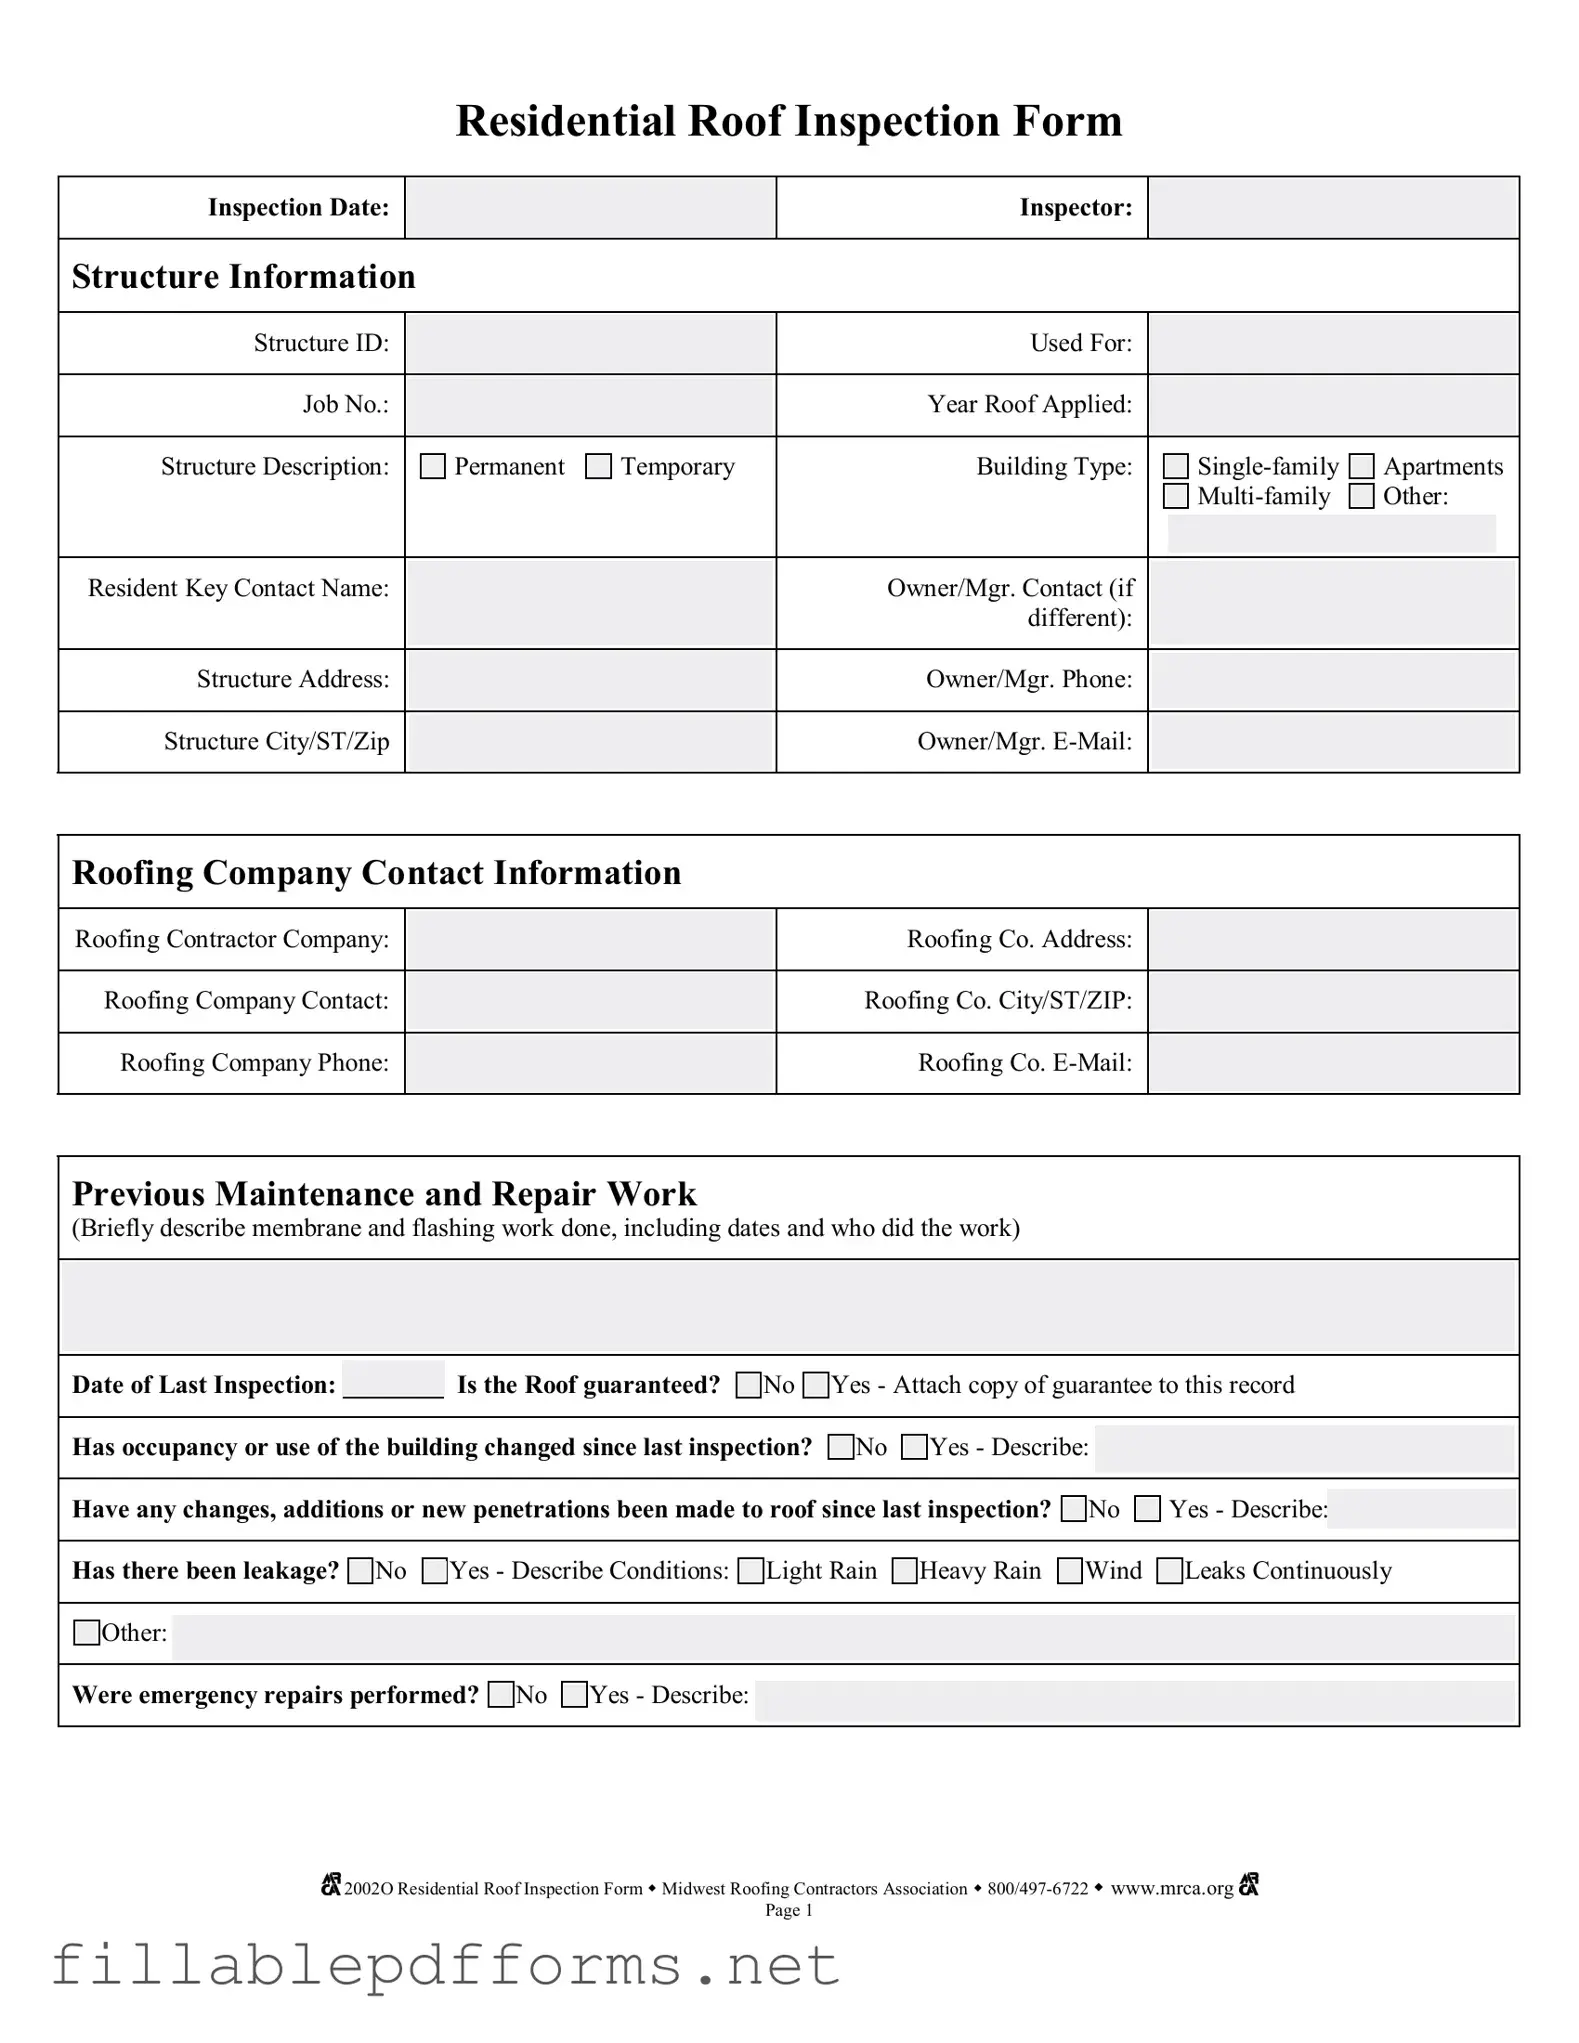
The Roof Inspection Form serves as a vital tool for assessing the condition and safety of residential roofs. It includes essential details such as the inspection date, the inspector's name, and specific information about the structure being evaluated. This information helps to identify the purpose of the inspection and the type of building involved, whether it is a single-family home, an apartment, or another structure. The form also collects contact information for both the owner or manager and the roofing company, ensuring clear communication throughout the inspection process. Previous maintenance and repair work are documented, along with any changes to the building's occupancy or roof structure since the last inspection. The form addresses any leakage issues, emergency repairs performed, and the overall condition of various roof components, such as the interior roof deck, walls, and exterior features. Each section uses a simple coding system to indicate the condition of these elements, helping to prioritize necessary actions. Additionally, a photographic record can be included to support findings. This comprehensive approach ensures that all aspects of the roof's health are thoroughly examined and recorded, promoting the safety and longevity of the structure.
Incomplete Structure Information: Failing to provide all necessary details such as the Structure ID, Job Number, or Year Roof Applied can lead to confusion and delays in processing the inspection.
Missing Contact Information: Not including the Owner/Manager's contact name, phone number, or email can hinder communication regarding the inspection results.
Neglecting Previous Maintenance Records: Omitting details about prior maintenance or repair work, including dates and contractors, may result in an incomplete assessment of the roof’s condition.
Failure to Indicate Changes: Not noting any changes in occupancy or structural modifications since the last inspection can lead to oversight of critical issues.
Inaccurate Condition Ratings: Providing incorrect ratings for roof conditions (Good, Fair, Poor) without thorough evaluation can mislead future maintenance decisions.
Omitting Leakage Descriptions: Not describing the conditions under which leaks occurred, such as during light rain or heavy rain, can prevent a proper understanding of the roof's performance.
Ignoring Emergency Repairs: Failing to document any emergency repairs performed can obscure the roof's true condition and history.
Not Using Photographic Evidence: Skipping the inclusion of photographs or videos to support the findings can weaken the inspection report.
Improperly Marking Roof Plan Grid: Neglecting to accurately mark all items on the roof plan grid with the appropriate codes can lead to misinterpretation of the inspection results.
Misconception 1: The Roof Inspection Form is only for new roofs.
This is not true. The form is designed for both new and existing roofs. It helps assess the current condition of the roof, regardless of its age. Regular inspections can identify issues early, preventing costly repairs in the future.
Misconception 2: A roof inspection guarantees that there will be no future problems.
No inspection can provide a complete guarantee against future issues. The Roof Inspection Form is a tool for evaluating the current state of the roof. It can highlight areas that need attention but cannot predict unforeseen events like severe weather or sudden structural changes.
Misconception 3: The form is too complicated for homeowners to understand.
While the form contains technical details, it is structured to be user-friendly. Homeowners can easily follow the sections and understand the basic requirements. Engaging a professional for assistance can further clarify any confusing aspects.
Misconception 4: Completing the form is optional for roofing contractors.
In many cases, completing the Roof Inspection Form is not optional. Contractors often need to document their findings for warranty purposes or insurance claims. Proper documentation is essential for maintaining records of the roof's condition over time.
Misconception 5: The inspection results are only relevant to the roofing contractor.
This is incorrect. The results are important for homeowners, property managers, and insurance companies as well. The findings can inform maintenance decisions, assist in budgeting for repairs, and help in understanding the roof's overall health.
Completing the Roof Inspection form is essential for documenting the condition of a roof. This process ensures that all necessary details are captured, providing a clear overview of the roof's status and any required actions. Follow these steps to fill out the form accurately.
When filling out the Roof Inspection form, there are several important guidelines to follow. Below is a list of things you should and shouldn't do.
Basketball Player Evaluation - Assess how well the player utilizes their non-dominant hand when shooting.
To facilitate a smooth transfer of ownership, it is crucial to utilize an efficient Illinois bill of sale that outlines the specifics of your transaction. For further details and to complete the necessary documentation, visit this informative site about a streamlined Illinois bill of sale procedure.
Da - Required for audits and inspections of military property.
How Do You Set Up Direct Deposit - Specify accounts for automatic transaction transfer.
When filling out and using the Roof Inspection form, keep these key takeaways in mind: